
Reverse sear is a newer term for the process of finishing over high heat a thick steak (or other piece of protein) after it’s been slow cooked, usually sous vide style or in a low temperature oven. This helps to develop flavor, prevent overcooking, and improve presentation. Read on to learn more about the history, why, and how you should use this method.

History of Reverse Searing
Some people refer to reverse searing as “cooking your meat backwards”. The history is a little hazy, but generally seems to have been pieced together by different cooks trying different techniques.
Reverse searing evolved from the sous vide method (what this whole site is dedicated to, of course), as a way to finish a food before serving. Some refer to it as the “Finney method”, as an ode to Christopher Finney, who, in 2001, began using this cooking technique for barbequed meats.1
Kenji Lopez-Alt, James Beard award winning columnist and food scientist, began using the reverse sear technique for Cook’s Illustrated magazine.2 He realized that the only foolproof way to cook a thick cut steak to perfection was to prepare it sous vide. Since sous vide machines were still only used on a large scale, and weren’t really available to the home cook, he modified his method. By slow cooking using a low temperature oven, then finishing with a high temp pan sear, he was able to produce a tender, juicy, perfectly cooked piece of steak with minimal gray zone. This recipe was published in 2007, and the rest, as they say, is history.
Why should we Reverse Sear?
Contrary to popular belief, searing meat does not lock in juices. Searing meat or other protein-rich food activates the Maillard Reaction. The Maillard Reaction is what happens when amino acids on the surface of food mix with sugars (also a byproduct of amino acids) and turn brown. It also helps to give the distinct flavors that one associates with browned foods; toasted, earthy, umami, “steak-y”, caramelized, burned, smoky, etc.
Reverse searing helps to prevent overcooking, keeps food tender, and is much easier than other cooking methods. By starting food in a low oven or sous vide, the temperature can be closely monitored. The food will come to the appropriate temperature slowly, giving time for the collagen and other connective tissues to begin to denature and break down, rendering the food much more tender and palatable.
Controlling the low temperatures also leaves more room for error. Cooking food over high heat is difficult; the outside can burn and char, leaving the inside raw and cold. And let’s be honest; leaving meat cooking for too long is never a good thing. An overcooked steak or dry piece of chicken makes for one of the most depressing dinners (in my humble opinion). Using a low temperature or sous vide opens a wider window to hit the sweet spot of doneness.
How to Reverse Sear Sous Vide
Simply put, reverse searing is as easy as cooking a piece of food over low heat until it reaches the perfect temperature, then giving it a finish over high heat for a brown, crispy, crunchy crust.
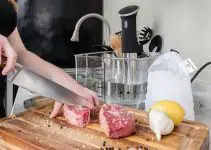
But, let’s get a little bit more specific; low temperature cooking can be done in an oven, over indirect heat on a grill, or using sous vide (our preferred method, and the method that we will outline here). Here is a foolproof outline for reverse searing a 1 ½ inch thick New York Strip steak (good choice, my friend);
- Dry off your steaks before cooking; this will help to get a better seal if using a vacuum-seal bag. (Read this to find the perfect vacuum sealer for your kitchen!)
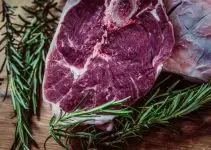
- Seal the steak with your choice of herbs (rosemary and a head of crushed garlic work well to complement the richness of the steak, and don’t forget the freshly ground black pepper and Kosher salt) in your sous vide vacuum sealer.
- Set the sous vide machine, in a large container of water, to the appropriate temperature (don’t forget to protect the surface on which the container is sitting!).
- Once the water is ready, submerge the sealed steak and cook for the appropriate amount of time.
- When the steak is finished, remove it from the bag and DRY IT OFF. This is super important; removing as much moisture from the outside of the meat ensures that it sears, and doesn’t steam in the pan. It also makes for less mess (water is what splatters when the meat hits the pan).
- In a ripping hot cast iron skillet or under a preheated broiler, finish the steak until it’s as brown as you’d like; be mindful that the longer you reverse sear, the more cooking the steak is receiving.
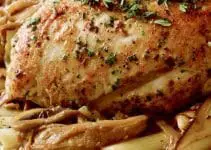
Check out some of our recipes for inspiration; this steak and asparagus recipe is a perfect example of using the reverse sear method.
Contributor:
This article was written by Stephanie Searor, MS RD LDN
References:

